Thursday, October 13, 2011

RMAN Database Backup Examples

RMAN is an utility used to perform backup and recovery in Oracle database. It comes integrated along with the Oracle Database software and doesn't need any kind of seperate configuration for performing simple backup and recovery operations.

Here I will be talking about some concepts of backup and try to give corresponding examples.

First lets talk about types of database backups that we can perform:
1. Cold Bakup:
                      It is taken when the database is not open, i.e. when modifications cannot be performed on the data files of the database.
                      In order to perform this kind of backup the database needs to be in mounted state.
                      Since no modification are performed on the datafiles at the time of backup, cold backup is called as consistent backup.
2. Hot Backup:
                      In this case the backup of the database is performed when the database is open i.e. when the backup is being performed the changes are still taking place in the datafiles of the database.

In order to use RMAN it is recommended to have the database in ARCHIVELOG mode.

Here the database that I am going to use is named ORCL.

Now let us see some examples of cold backup first:
1. First shutdown your database:


2. Now startup the database in mount state:


3. Connect to RMAN


4. To take full backup of the database execute the command BACKUP DATABASE in the RMAN prompt:


Now that we know how to take cold consistent backup of the database; let's see how we can perform the open inconsistent backup of the database:

1. First let us confirm that the database is in open mode:


  2. Next let us connect to RMAN:


3. Take the backup of the database as in the previous case:


4. In the case of hot backup i.e. open or inconsistent backup it is recommended to take backup of the ARCHIVELOG files in case there is a need to perform recovery of the database using the hot backup


5. Finally Oracle recommends to perform a log switch in order to archive all the transaction information that are there generated during the backup of the database:


More examples to follow.


Also visit my other blogs for other interesting Oracle related topics

http://oracledisasterrecovery.blogspot.com/

http://dbfromimagecopy.blogspot.com/

http://tamalosauthenticationprefix.blogspot.com/


http://oraclegridinfo.blogspot.com/

http://oracle-tamal.blogspot.com/

Friday, September 30, 2011

Disaster recovery using backupset

Here we are taking into account that we have a database by the name of db2 whose backup is available with us as backupset.

Step 1:

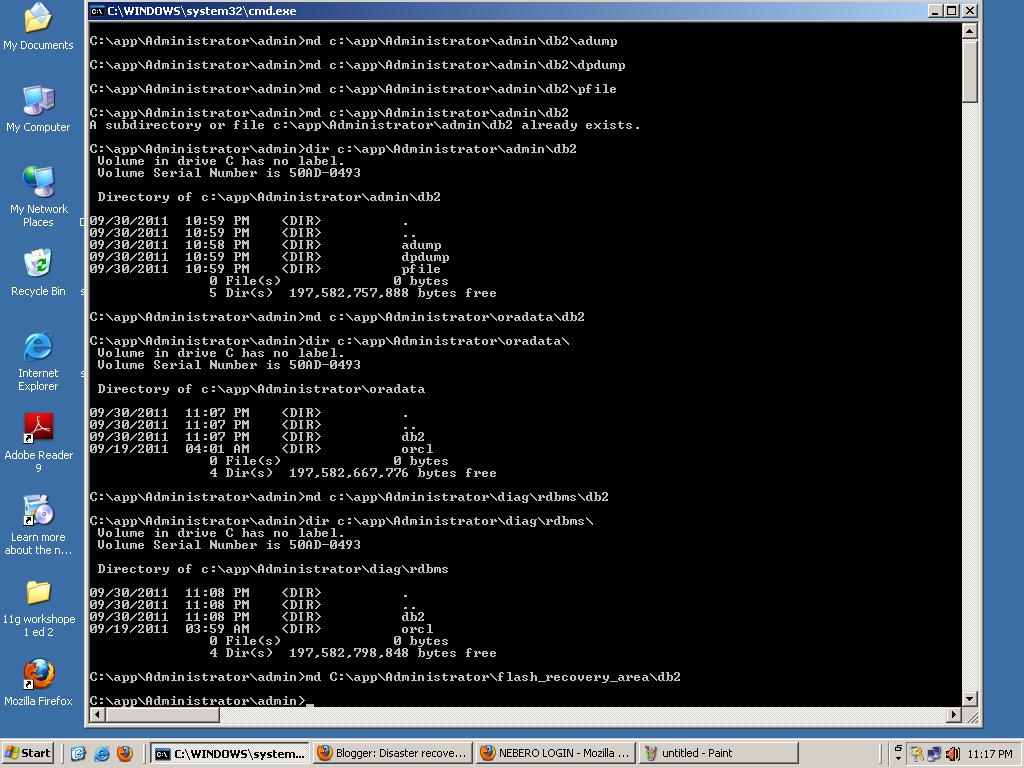
First create in the folder C:\app\Administrator\admin\ folders called db2 and within db2 create three other folders called adump, dpdump and pfile.


Create a folder called db2 inside the C:\app\Administrator\flash_recovery_area and within it create a folder called backupset.

Inside the C:\app\Administrator\oradata create a folder called db2.

Create db2 folder inside C:\app\Administrator\diag\rdbms path


Step 2:

Create a file called "initdb2.ora" with the following entries:
*.db_name='db2'
*.db_block_size=8192
*.db_recovery_file_dest='C:\app\Administrator\flash_recovery_area'
*.db_recovery_file_dest_size=4102029312


Step 3:

Copy the backup set files from your backup location to "C:\app\Administrator\flash_recovery_area\db2"

Step 4:

In windows platform create a service named DB2 using the oradim utility:


If you check the services.msc you will find the OracleServiceDB2 in it.

Step5:

Create a password file for db2 database using the orapwd command:


Step5:

Startup the database using the pfile we created in Step 2


Step6

Restore the controlfile from the latest backuppiece which you have:


 Step7

Bring the database to mount state using the controlfile we have just restored:


Step8

Restore the database using RMAN


 Step9:

Bring the database to open mode using SQL:


Step10:

Check the status of the database to verify:


Monday, August 1, 2011

Creating Physical Database in 11g using active database in text mode


Creating a physical standby database:

1.       Primary Database: orcl1 on node1
Standby Database: orcl2 on node2
2.       Create a database by the global database name of orcl and Oracle SID=orcl1
As a result if you look into the initorcl.ora file of primary database you will see the following parameter values:
db_name=orcl
db_unique_name=orcl1
3.       Open the netmgr on the node1 and make a static entry for the orcl database and the orcl1 database.Keep in mind that both of them will have the same entry.
4.       Open the netmgr on the node1 and make a static entry for the orcl database and the orcl2 database.Keep in mind that both of them will have the same entry.
5.       Make a service using netmgr in the node1 called orcl1 and orcl2:
orcl1 -> orcl1
orcl2 -> orcl2
6.       Make a service using netmgr in the node2 called orcl1 and orcl2:
orcl1 -> orcl1
orcl2 -> orcl2
7.       Enable archiving on the primary database:
SQL> connect sys/oracle@orcl1 as sysdba
SQL> shutdown immediate
SQL> startup mount
SQL> alter database archivelog;
SQL> alter database open;
8.       Enable flash back database on the primary database:
SQL> alter database flashback on;
9.       Next add some standby log files in the orcl1:
SQL>conn sys/oracle@orcl1 as sysdba
SQL>  alter database add standby logfile=’/u01/app/oracle/oradata/orcl/srl01.log’ size 3G;
SQL>  alter database add standby logfile=’/u01/app/oracle/oradata/orcl/srl02.log’ size 3G;
SQL>  alter database add standby logfile=’/u01/app/oracle/oradata/orcl/srl03.log’ size 3G;
10.   Make the following addition to the primary database:
SQL>conn sys/oracle@orcl1 as sysdba
SQL> ALTER SYSTEM SET LOG_ARCHIVE_CONFIG=’dg_config=(orcl1,orcl2)’;
SQL> ALTER SYSTEM SET log_archive_dest_2=’service=orcl2 async  valid_for=(online_logfiles,primary_role) db_unique_name=orcl2’;
SQL>ALTER SYSTEM SET fal_client=’orcl1’;
SQL> ALTER SYSTEM SET fal_server=’orcl2’;
SQL> ALTER SYSTEM log_archive_dest_state_2=’enable’;
11.   Increase the size of the flash recovery area of orcl1:
SQL> connect sys/oracle@orcl1
SQL>alter system set db_recovery_file_dest_size=5G;
12.   Copy the password from the node1 to the same location in the node2:
/u01/app/oracle/product/11.2.0/db_1/dbs/pwdorcl1.ora -> /u01/app/oracle/product/11.2.0/db_1/dbs/pwdorcl2.ora
13.   Create a pfile in the node2 with only entry suppose /u01/initorcl2.ora:
db_name=orcl
14.   Create the following directories manually on node2:
/u01/app/oracle/admin/orcl
/u01/app/oracle/admin/orcl/adump
/u01/app/oracle/oradata/orcl
15.   Startup the standby database in nomount state using the pfile created in step 11.
SQL> connect sys/oracle@orcl2 as sysdba
SQL> startup pfile=’/u01/initorcl2.ora’ nomount
16.   Restart the listener on both the database:
$ lsnrctl stop
$ lsnrctl start
17.   From the primary database use the following commands:
 $ rman
RMAN> connect target sys/oracle@orcl1
RMAN> connect auxiliary sys/oracle@orcl2
18.   Run the following rman script to perform the standby creation:
RMAN> run{
allocate channel c1 type disk;
allocate channel c2 type disk;
allocate channel c3 type disk;
allocate channel c4 type disk;
allocate auxiliary channel stby type disk;
duplicate target database for standby from active database
spfile
parameter_value_convert ‘orcl1’,’orcl2’
set db_unique_name=’orcl2’
set control_files=’/u01/app/oracle/oradata/orcl/control01.ctl’
set log_archive_max_processes=’5’
set fal_client=’orcl2’
set fal_server=’orcl1’
set log_archive_config=’dg_config=(orcl1,orcl2)’
set log_archive_dest_2=’service=orcl1 async valid_for=(ONLINE_LOGFILES,PRIMARY_ROLE) db_unique_name=orcl1’
;
}
19.   Once the standby database has been created check if the standby database is in archivelog mode and flashback database is on. If not set them up in the standby database.
20.   Testing the dataguard configuration:
In the primary database execute some log switch:
SQL> connect sys/oracle@orcl1 as sysdba
SQL> ALTER DATABASE SWITCH LOGFILE;
Execute the following command to check if the logfiles have been applied:
SQL> SELECT sequence#, applied from v$archived_log order by sequence#;
If there are any archivelog files that are not applied to the standby the execute the following command in the standby to perform recovery of the standby:
SQL> connect sys/oracle@orcl2
SQL>ALTER DATABASE RECOVER MANAGED STANDBY DATABASE USING CURRENT LOGFILE DISCONNECT;
Reconnect to the primary database and recheck if the archives are getting transported and applied using the command:
SQL>connect sys/oracle@orcl1 as sysdba
SQL> SELECT sequence#, applied from v$archived_log order by sequence#;

Friday, July 1, 2011

Create New Database using Image Copy Backup in Oracle

Suppose the source database is T1 and we want to create a new database T9 from it.

1. Connect to T1 database using sqlplus as sysdba:

C:\Documents and Settings\Administrator>set ORACLE_SID=T1

C:\Documents and Settings\Administrator>sqlplus / as sysdba

SQL*Plus: Release 10.2.0.3.0 - Production on Fri Jul 1 15:37:12 2011

Copyright (c) 1982, 2006, Oracle.  All Rights Reserved.


Connected to:
Oracle Database 10g Enterprise Edition Release 10.2.0.3.0 - Production
With the Partitioning, OLAP and Data Mining options

SQL>

2. Create a pfile named initt9.ora from the spfile and store it into the ORACLE_HOME\database folder

SQL> create pfile='c:\oracle\product\10.2.0\db_1\database\initt9.ora' from spfile;

File created.


3. Open the initt9.ora and make the changes in it such that instead of t1 it reflects t9. A sample initt9 file will look like this:

t9.__db_cache_size=415236096
t9.__java_pool_size=16777216
t9.__large_pool_size=4194304
t9.__shared_pool_size=171966464
t9.__streams_pool_size=0
*.audit_file_dest='C:\oracle\product\10.2.0\admin\t9\adump'
*.background_dump_dest='C:\oracle\product\10.2.0\admin\t9\bdump'
*.compatible='10.2.0.3.0'
*.control_files='C:\oracle\product\10.2.0\oradata\t9\control01.ctl','C:\oracle\product\10.2.0\oradata\t9\control02.ctl','C:\oracle\product\10.2.0\oradata\t9\control03.ctl'
*.core_dump_dest='C:\oracle\product\10.2.0\admin\t9\cdump'
*.db_block_size=8192
*.db_domain=''
*.db_file_multiblock_read_count=16
*.db_name='t9'
*.db_recovery_file_dest='C:\oracle\product\10.2.0\flash_recovery_area'
*.db_recovery_file_dest_size=2147483648
*.dispatchers='(PROTOCOL=TCP) (SERVICE=t9XDB)'
*.job_queue_processes=10
*.log_archive_format='ARC%S_%R.%T'
*.open_cursors=300
*.pga_aggregate_target=203423744
*.processes=150
*.remote_login_passwordfile='EXCLUSIVE'
*.sga_target=612368384
*.undo_management='AUTO'
*.undo_tablespace='UNDOTBS1'
*.user_dump_dest='C:\oracle\product\10.2.0\admin\t9\udump'

4. Create the necessary folders as required by looking into the pfile. Specifically create folders:
  • C:\oracle\product\10.2.0\admin\t9\pfile
  • C:\oracle\product\10.2.0\admin\t9\adump
  • C:\oracle\product\10.2.0\admin\t9\bdump
  • C:\oracle\product\10.2.0\admin\t9\cdump
  • C:\oracle\product\10.2.0\admin\t9\dpdump
  • C:\oracle\product\10.2.0\admin\t9\udump
  • C:\oracle\product\10.2.0\oradata\t9
  • C:\oracle\product\10.2.0\flash_recovery_area\t9

5. Create a servie for the t9 instance:
C:\Documents and Settings\Administrator>oradim -new -sid t9
Instance created.


6. Create a password file for the t9 instance in the ORACLE_HOME\database folder:
C:\Documents and Settings\Administrator>orapwd file=c:\oracle\product\10.2.0\db_
1\PWDt9.ora password=oracle

7. Connect to the t1 instance and create a trace file of the control file:
C:\Documents and Settings\Administrator>sqlplus / as sysdba
SQL*Plus: Release 10.2.0.3.0 - Production on Fri Jul 1 15:55:17 2011
Copyright (c) 1982, 2006, Oracle.  All Rights Reserved.
Connected to:
Oracle Database 10g Enterprise Edition Release 10.2.0.3.0 - Production
With the Partitioning, OLAP and Data Mining options

SQL> alter database backup controlfile to trace as 'c:\control.txt';


Database altered.

8. Open theControlfile trace and do the following task:
  • Delete all the lines starting with --
  • Delete the section that specifies how to recreate the controlfile and open it in NORESETLOGS mode.
  • Change the entries of T1 to T9 
  • Where it is written CREATE CONTROLFILE REUSE DATABASE "T1" RESETLOGS change it to CREATE CONTROLFILE SET DATABASE "T9" RESETLOGS
  • Remove the line that reads  RECOVER DATABASE USING BACKUP CONTROLFILE
At the end the trace file should read something like this:

STARTUP NOMOUNT
CREATE CONTROLFILE SET DATABASE "T9" RESETLOGS  ARCHIVELOG
    MAXLOGFILES 16
    MAXLOGMEMBERS 3
    MAXDATAFILES 100
    MAXINSTANCES 8
    MAXLOGHISTORY 292
LOGFILE
  GROUP 1 'C:\ORACLE\PRODUCT\10.2.0\ORADATA\T9\REDO01.LOG'  SIZE 50M,
  GROUP 2 'C:\ORACLE\PRODUCT\10.2.0\ORADATA\T9\REDO02.LOG'  SIZE 50M,
  GROUP 3 'C:\ORACLE\PRODUCT\10.2.0\ORADATA\T9\REDO03.LOG'  SIZE 50M
DATAFILE
  'C:\ORACLE\PRODUCT\10.2.0\ORADATA\T9\SYSTEM01.DBF',
  'C:\ORACLE\PRODUCT\10.2.0\ORADATA\T9\UNDOTBS01.DBF',
  'C:\ORACLE\PRODUCT\10.2.0\ORADATA\T9\SYSAUX01.DBF',
  'C:\ORACLE\PRODUCT\10.2.0\ORADATA\T9\USERS01.DBF',
  'C:\ORACLE\PRODUCT\10.2.0\ORADATA\T9\EXAMPLE01.DBF'
CHARACTER SET WE8MSWIN1252
;

VARIABLE RECNO NUMBER;
EXECUTE :RECNO := SYS.DBMS_BACKUP_RESTORE.SETCONFIG('CONTROLFILE AUTOBACKUP','ON');

ALTER DATABASE REGISTER LOGFILE

'C:\ORACLE\PRODUCT\10.2.0\FLASH_RECOVERY_AREA\T9\ARCHIVELOG\2011_07_01\O1_MF_1_1_%U_.ARC';
ALTER DATABASE REGISTER LOGFILE

'C:\ORACLE\PRODUCT\10.2.0\FLASH_RECOVERY_AREA\T9\ARCHIVELOG\2011_07_01\O1_MF_1_1_%U_.ARC';

RECOVER DATABASE USING BACKUP CONTROLFILE


ALTER DATABASE OPEN RESETLOGS;


ALTER TABLESPACE TEMP ADD TEMPFILE 'C:\ORACLE\PRODUCT\10.2.0\ORADATA\T9\TEMP01.DBF'SIZE 29360128  REUSE AUTOEXTEND ON NEXT 655360  MAXSIZE 32767M;

 9. Shutdown the T1 database:
SQL> shutdown immediate
Database closed.
Database dismounted.
ORACLE instance shut down.

10. Copy all the datafiles and Online Redo Log Files from the C:\oracle\product\10.2.0\oradata\t1 to the folder C:\oracle\product\10.2.0\oradata\t9
Note: Remember not to copy the controlfiles.

11. Startup the t9 instance in nomount mode:

C:\Documents and Settings\Administrator>set ORACLE_SID=t9
C:\Documents and Settings\Administrator>sqlplus / as sysdba

SQL*Plus: Release 10.2.0.3.0 - Production on Fri Jul 1 16:15:58 2011

Copyright (c) 1982, 2006, Oracle.  All Rights Reserved.

Connected to an idle instance.

SQL> startup nomount
ORACLE instance started.

Total System Global Area  612368384 bytes
Fixed Size                  1292060 bytes
Variable Size             197134564 bytes
Database Buffers          411041792 bytes
Redo Buffers                2899968 bytes


12. Set the oracle environment to t9 and run the controlfile script created priviously:

SQL> CREATE CONTROLFILE SET DATABASE "T9" RESETLOGS  ARCHIVELOG MAXLOGFILES 16 M
AXLOGMEMBERS 3 MAXDATAFILES 100 MAXINSTANCES 8 MAXLOGHISTORY 292 LOGFILE GROUP 1
 'C:\ORACLE\PRODUCT\10.2.0\ORADATA\T9\REDO01.LOG'  SIZE 50M, GROUP 2 'C:\ORACLE\
PRODUCT\10.2.0\ORADATA\T9\REDO02.LOG'  SIZE 50M, GROUP 3 'C:\ORACLE\PRODUCT\10.2
.0\ORADATA\T9\REDO03.LOG'  SIZE 50M DATAFILE  'C:\ORACLE\PRODUCT\10.2.0\ORADATA\
T9\SYSTEM01.DBF',   'C:\ORACLE\PRODUCT\10.2.0\ORADATA\T9\UNDOTBS01.DBF', 'C:\ORA
CLE\PRODUCT\10.2.0\ORADATA\T9\SYSAUX01.DBF', 'C:\ORACLE\PRODUCT\10.2.0\ORADATA\T
9\USERS01.DBF',  'C:\ORACLE\PRODUCT\10.2.0\ORADATA\T9\EXAMPLE01.DBF' CHARACTER S
ET WE8MSWIN1252;

Control file created.

13. Open the database using the resetlogs option:
SQL> alter database open resetlogs;
Database altered.

14. Check the status of the T9 database from the v$instance view:
SQL> select instance_name,status from v$instance;

INSTANCE_NAME    STATUS
---------------- ------------
t9               OPEN

15. If you want you can configure the enterprise manager database control for T9 database as well:

C:\Documents and Settings\Administrator>emca -config dbcontrol db

STARTED EMCA at Jul 1, 2011 4:40:29 PM
EM Configuration Assistant, Version 10.2.0.1.0 Production
Copyright (c) 2003, 2005, Oracle.  All rights reserved.

Enter the following information:
Database SID: t9
Listener port number: 1521
Password for SYS user:
Password for DBSNMP user:
Password for SYSMAN user:
Email address for notifications (optional):
Outgoing Mail (SMTP) server for notifications (optional):
-----------------------------------------------------------------

You have specified the following settings

Database ORACLE_HOME ................ C:\oracle\product\10.2.0\db_1

Database hostname ................ Lab142
Listener port number ................ 1521
Database SID ................ t9
Email address for notifications ...............
Outgoing Mail (SMTP) server for notifications ...............

-----------------------------------------------------------------
Do you wish to continue? [yes(Y)/no(N)]: Y
Jul 1, 2011 4:40:48 PM oracle.sysman.emcp.EMConfig perform
INFO: This operation is being logged at C:\oracle\product\10.2.0\db_1\cfgtoollog
s\emca\t9\emca_2011-07-01_04-40-29-PM.log.
Jul 1, 2011 4:40:52 PM oracle.sysman.emcp.util.DBControlUtil startOMS
INFO: Starting Database Control (this may take a while) ...
Jul 1, 2011 4:41:32 PM oracle.sysman.emcp.EMDBPostConfig performConfiguration
INFO: Database Control started successfully
Jul 1, 2011 4:41:33 PM oracle.sysman.emcp.EMDBPostConfig performConfiguration
INFO: >>>>>>>>>>> The Database Control URL is http://Lab142:5502/em <<<<<<<<<<<
Enterprise Manager configuration completed successfully
FINISHED EMCA at Jul 1, 2011 4:41:33 PM

16. Access the enterprise manager database console to verify:


Cheers!!!